
Improve your Landscape Photography
I love landscapes! Finding a passion for landscape photography was something that came naturally for me. From an early age, I looked at the work of Ansel Adams with such admiration and was inspired to grow in the craft.
So easy peasy, right? I just needed to pick up a camera, find a beautiful location and boom, landscape photography! Turns out it’s a bit more complicated.
In addition to the startup costs for getting your hands on a quality camera, actually learning to master that tool and apply those skills proved a bit more challenging. So what’s a lady to do? Well, you can learn along with me! Here are some of the tools I’ve used to improve my landscape photography shots.

GEAR FOR BEAUTIFUL LANDSCAPES
While gear should never stop you from getting out and taking great photographs, there are a few things I can recommend that will help. Hopefully, these tools will up your photography game and allow your landscape shots to reach new heights (hehe)!
Of course, take everything with a grain of salt. For example, I do not currently have a full-frame camera in my repertoire (maybe soon!) and that doesn’t stop me from striving to take some banger landscape photography shots.
If you have been thinking about upping your landscape photo-game, here is a list of gear I would recommend adding to your shopping cart.
1. Full-frame camera body
2. Wide-angle lens(es)
3. Sturdy travel tripod
4. Remote control

THE CAMERA BODY & THE HARD TRUTH
If you’re like me, and you wanted a starter camera body that wasn’t astronomically pricey, you probably opted for one with an APS-C (aka cropped) sensor. With many styles of photography – portrait, lifestyle, product, food, and the list goes on – this type of camera body works great because you have control over the subject and your distance from that subject. However, with landscape photography, this is not exactly the case.
When you’re atop a mountain peak, trying to capture the mountain range in the distance, there’s a hard limit on your range of movement (the cliff beside you). This is where the full-frame sensor cameras make a world of difference.

Allow me to break it down.
The key difference between full-frame and APS-C sensors is the former gives you that full 35mm range, while the APS-C is delivering a 1.5x cropped frame, turning that field of view into more of a 50mm range. In landscape photography, this means the difference between capturing that full, magnificent mountain range and capturing just two-thirds of that beauty. Which do you prefer?
But this certainly comes with a hefty price. And for a lot of beginner photographers, it is really not worth that kind of investment. So don’t be afraid to get an APS-C camera body, develop those skills, get crafty, and then once you’re sick of dealing with cropped images (like I am), upgrade to that full-frame. Not ready to bite the bullet? There are other ways. You can certainly opt to adjust your range by working with wide-angle lenses.

WIDE ANGLE LENS ESSENTIALS
If you’re looking to get your hands on a new wide-angle lens, this would include anything under 35mm. But the list of specs differentiating one wide-angle from the next is nearly endless.
Luckily, when it comes to these lenses there is huge variability in both quality and cost. While I may not myself own the best wide-angle lens out there, I’ve certainly researched and dreamed of all the incredible lenses I might own one day. So grab your reading glasses and settle in for a whole lotta information.
Like most, wide-angle lenses come in the form of either the prime (fixed) or zoom (variable). The differences here come down to quality, speed, and functionality. If you are looking to get your hands on a fast lens, with a low aperture, that is more of a pro-quality, I would recommend going with a prime lens. But if you’re more interested in the run-and-gun style photography, that is light-weight, small, and travel-ready, this is where a wide-angle zoom lens is great to have on hand.
However, there is truly a lot of variability in size and quality within each of these two categories.
Here are some great small and fast prime lenses that come at a reasonable price:
· Nikon AF-S DX NIKKOR 35mm f/1.8G Lens
As well as a few quality zoom lens options that won’t break the bank:
· Nikon AF-S DX NIKKOR 16-85mm F3.5-5.6G ED VR
Now, when you are actually getting into the purchasing stage, always be sure to check that the lens has the proper mounting for your camera body. This is especially important when you have either a full-frame or mirrorless camera, they have special sizing and mounting requirements for their lenses.
If you end up giving any of these a try, I would love to hear your thoughts in the comments section down below!

INVEST IN A GOOD TRIPOD
Ugh, carrying around a tripod is just one of those things, ya know? The amount of whining I do when it comes to tripods is probably a bit excessive. So I will spare you.
Here’s the thing, as bulky and cumbersome as tripods can be, they are truly a great asset when it comes to landscape photography. Though I have not followed this tidbit of advice as much as I should, I would really recommend learning to use and love your tripod. Doing this from the start will make you less agitated down the road when you realize how much it can improve your photography.
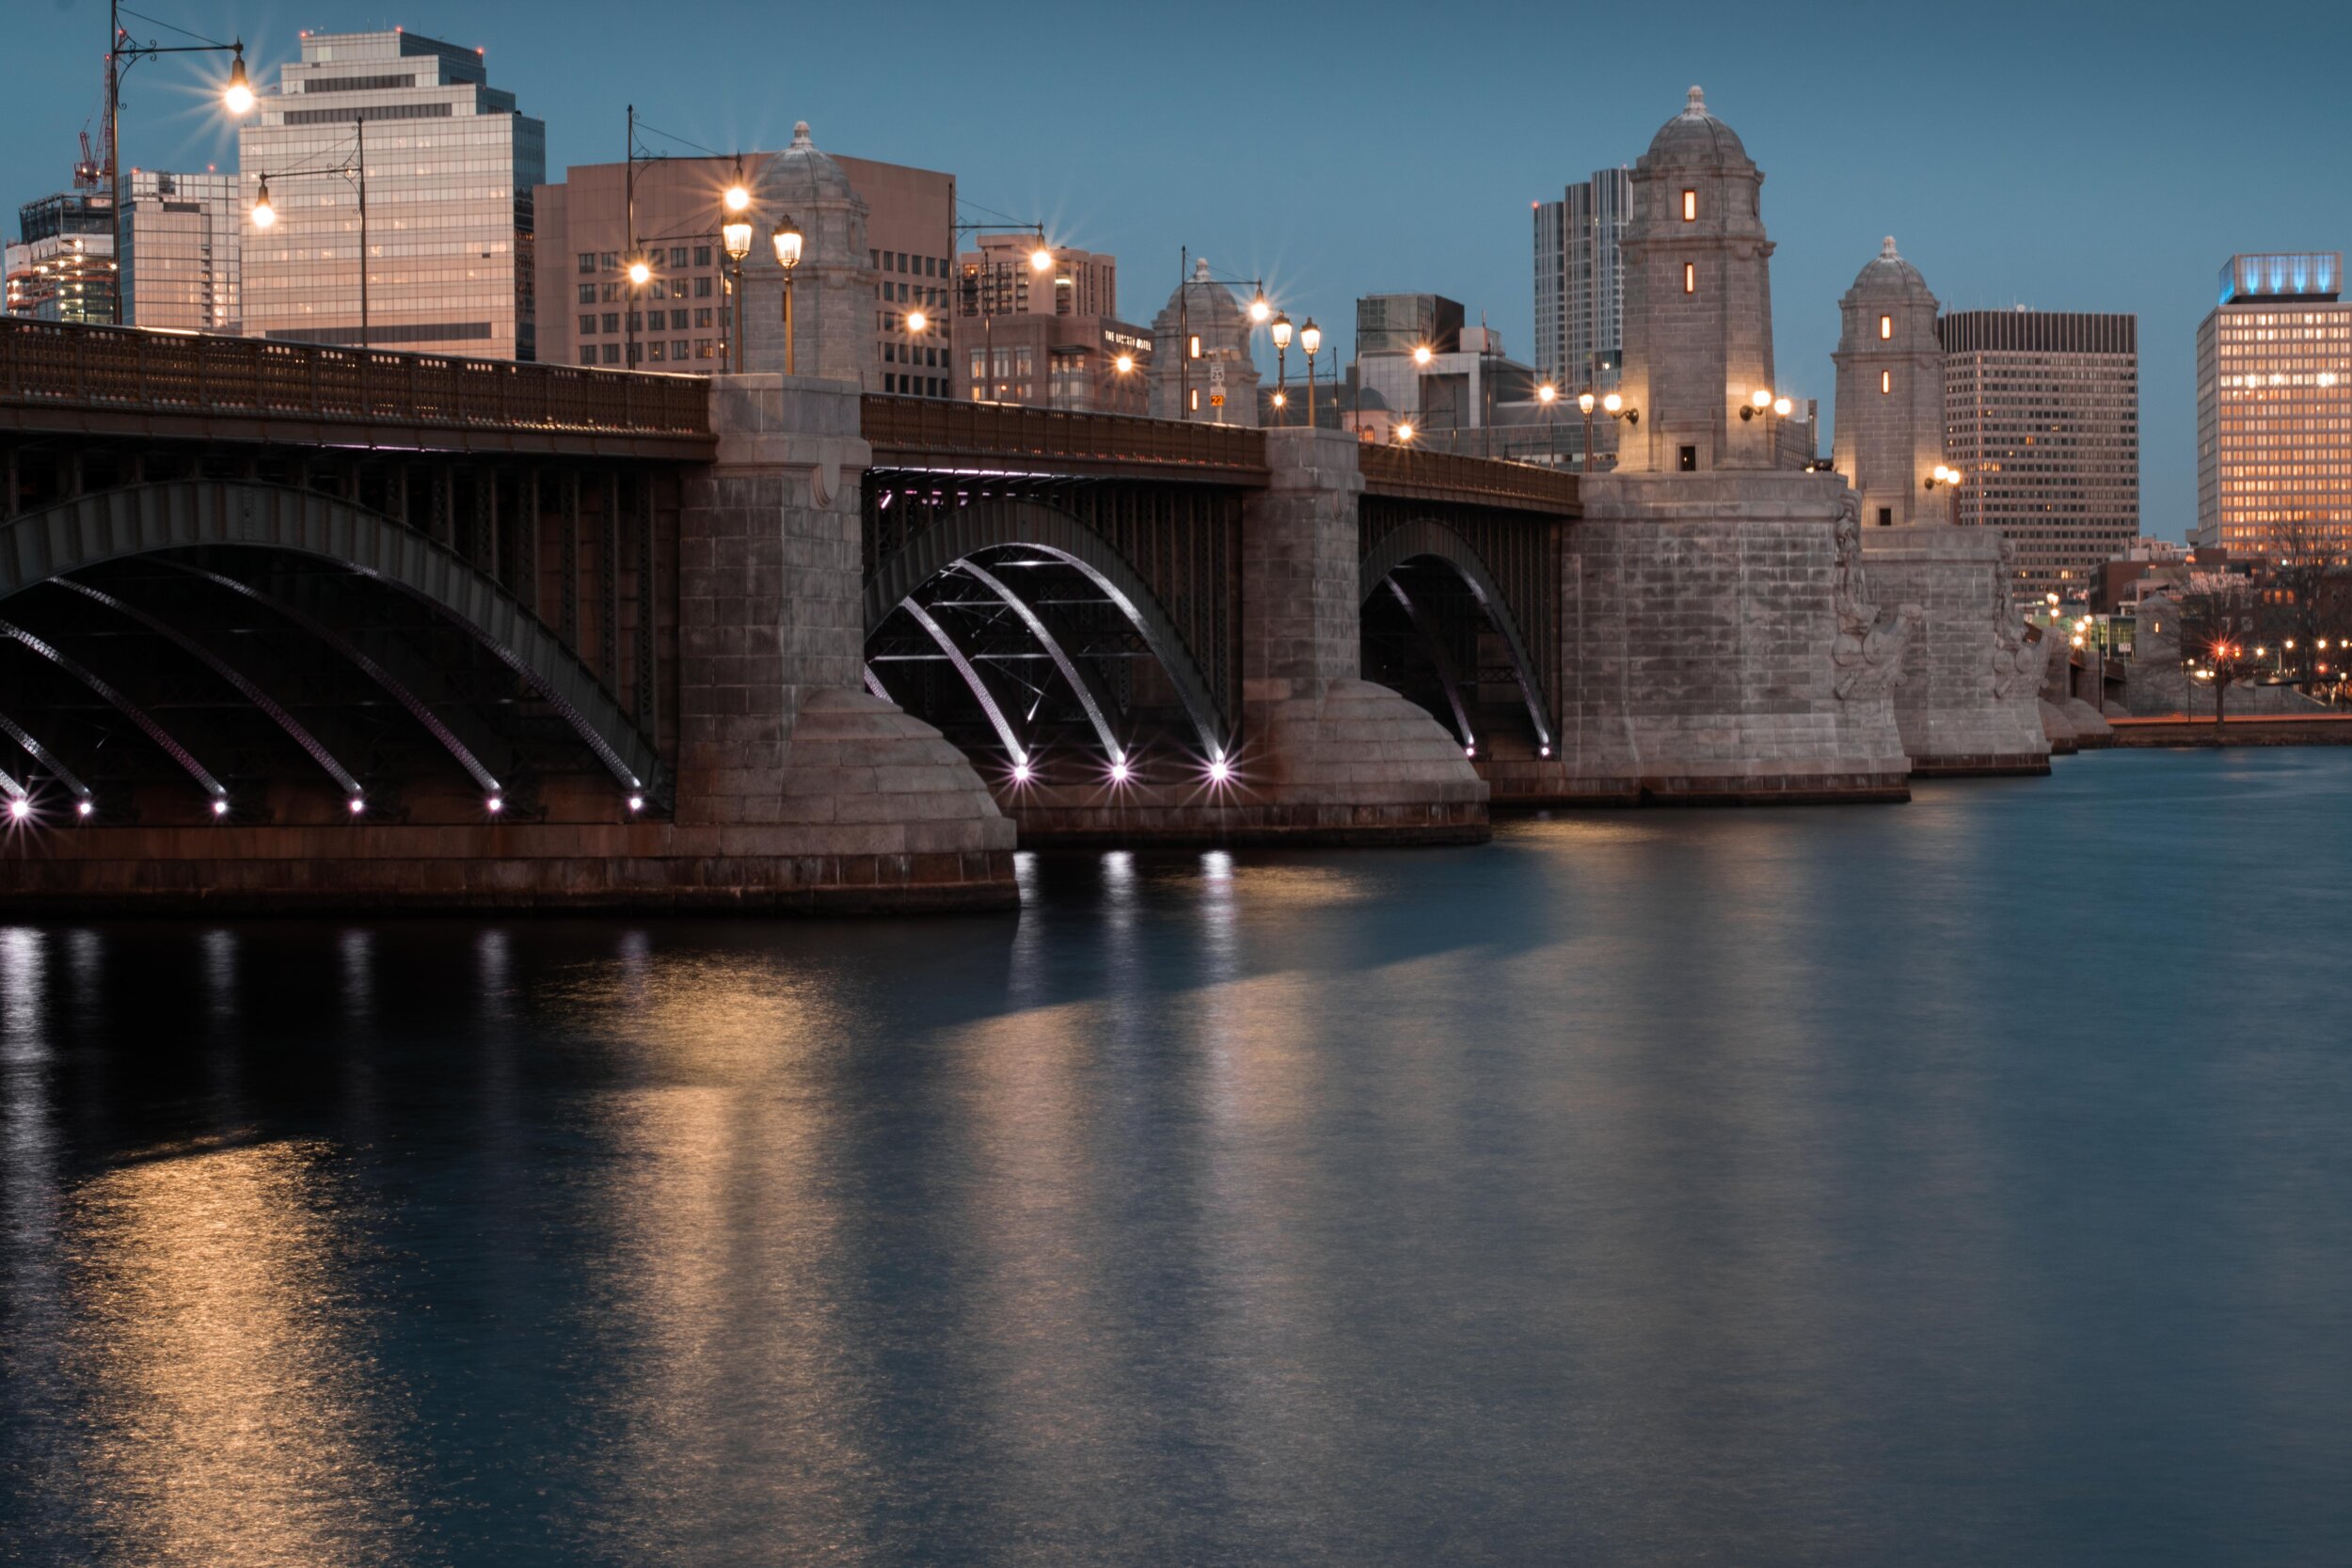
If you are going out to shoot landscapes during golden hour or blue hour, or really anytime when the sunlight is low, a tripod is going to make a world of difference. Especially if you’re working with a slower lens. The smaller the aperture (high f-stop number) the more you are going to have to slow down that shutter speed. And unless you’ve got a VERY steady hand, this will probably result in some shakey and blurry shots (see below example).
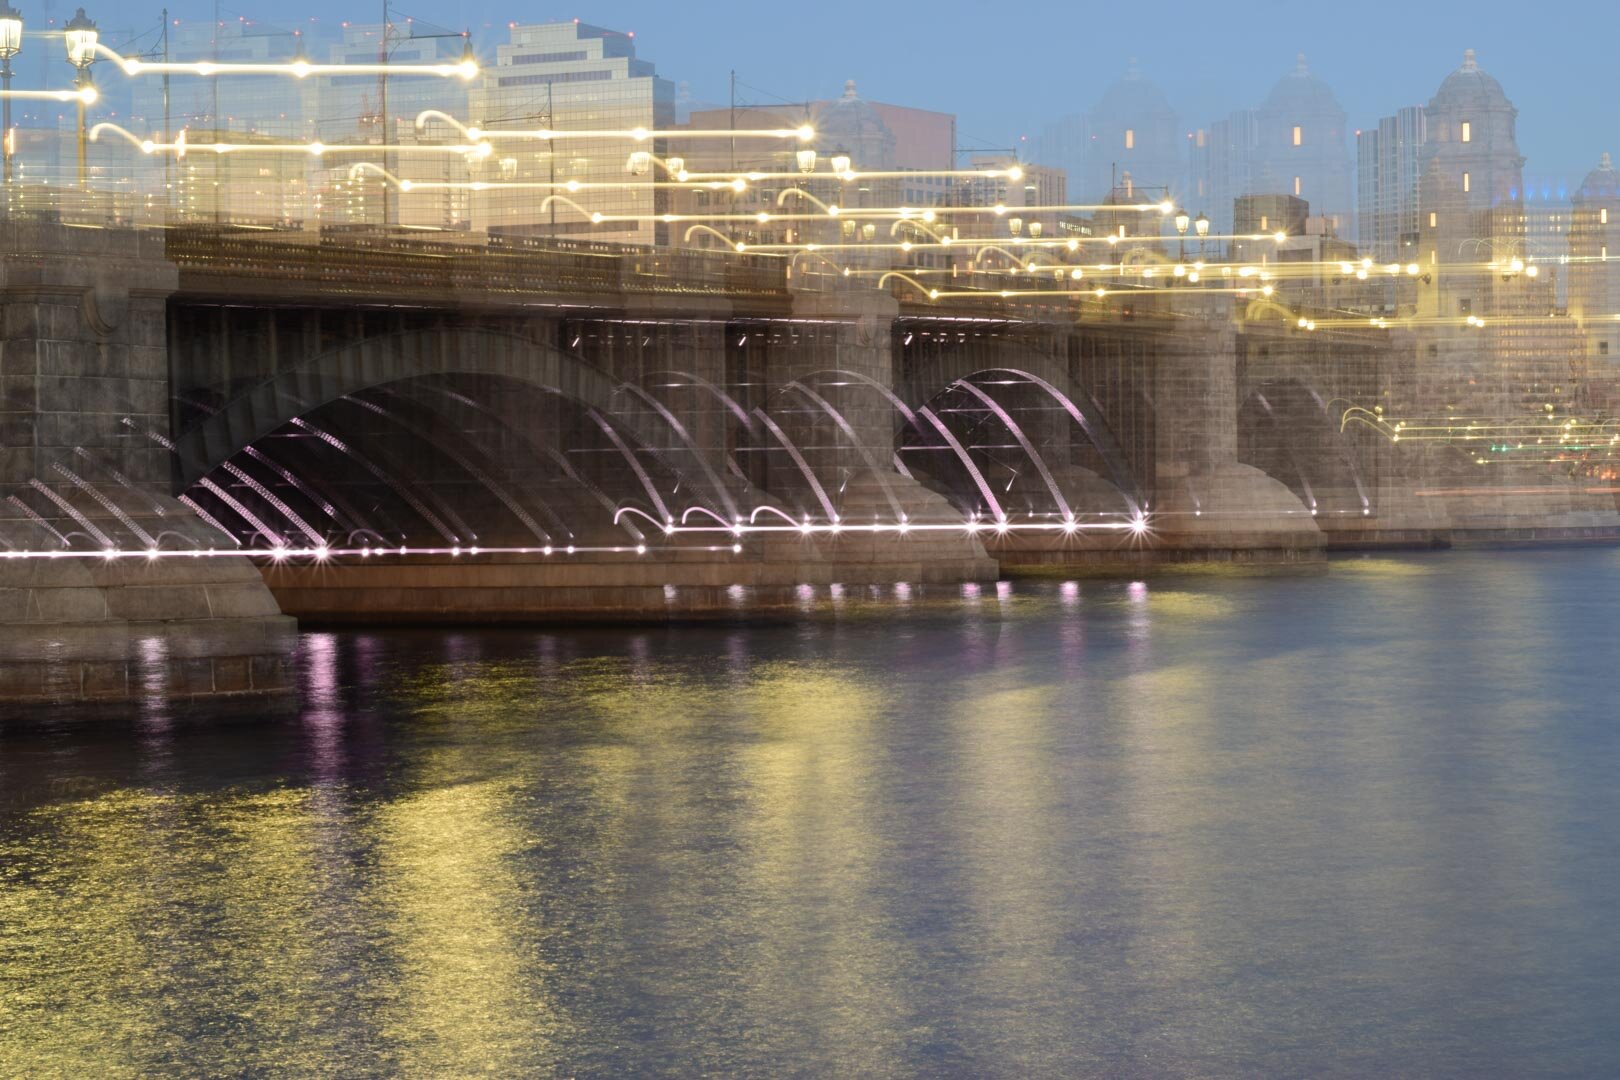
So do yourself and your photographs a favor – invest in a tripod. If you are just starting out and you need a quality, reliable, and inexpensive tripod, I would recommend the Dolica B100 Proline 62” tripod. While this isn’t necessarily the slimmest or lightest tripod in the world, it is very user-friendly and the design is everything you need it to be. This bad boy is made of aluminum and comes with a detachable ball-head, multiple bubble leveling gauges, a quick-release plate, a compass, easily-adjustable flip-locks, an extendable center column, a counter-weight hook, and so much more. All-in-all these features make up a great starter tripod to get your feet wet.
If tripods aren’t new to you, feel free to skip to this next paragraph.
Perhaps tripods are old-news and you get how useful they are, but if you are like me and you really can’t stand how heavy they can be to carry around. Allow me to introduce you to the new Peak Design Travel Tripod. After clicking on the links for both of these recommended tripods, you should immediately see a few clear differences when it comes to size and price. This compact, lightweight, highly-functional travel tripod has a number of fantastic features packed into a collapsed 3” diameter, 15” height body. Fully extended, this tripod falls two inches shorter than it’s starter-tripod competitor. But I think it makes up for this tiny difference in height with the fact that it is about half the weight.
PROTIP: Don’t forget to put a counterweight on your tripod!
Do you have a favorite tripod in either the starter or travel-friendly categories? Let me know in the comments below!

REMOTE CONTROL: GAME CHANGER
Finally, we have arrived at my fourth recommendation when it comes to landscape photography tools: a remote. Though I don’t have a ton to say about this one, it is just as important as the others. Taking advantage of those beautiful low-light hours really requires some sort of remote control. Even more so if you are looking to take some long-exposure shots of water within your landscape, this tool will make a dramatic difference in your photos.
If you are like me and you’re trying not to add a million tiny gadgets to your everyday carry, your phone can be a great alternative to going out and buying your camera manufacturer’s remote. As long as your DSLR or mirrorless camera comes equipped with built-in wifi, all you need to do is download the appropriate app and you’re good to go! (For my fellow Nikon shooters out there, the app is Nikon Wireless Mobile Utility ).
After a quick installation of your respective camera’s wifi-remote app, your phone will be able to connect to and control the shutter on your camera. Boom! You have a remote control!
Next Blog Post: To be continued…
Hopefully, these tools will help serve as a starting point for you to get out there and start shooting. Next up, we will get into some of the landscape photography composition techniques, as well as ways to get out there and get inspired for your next shoot.
Hey there! It’s bopphoto, aka Sarah Bopp, your internet pal and photographer. Lover of coffee, plants, nature, and old cameras.
Here you will find everything from my photoshoots, posts on tips & tricks, things that inspire me, and some behind the scenes content.
Peace & love,
Sarah
Looking for something?
-
February 2024
- Feb 5, 2024 Exploring the Heart of Your Brand: Woodland Lifestyle Photography for Outdoor Gear Feb 5, 2024
- Feb 2, 2024 Capturing the Essence of Adventure: Unveiling the Magic of Our Outdoor Commercial Photography Feb 2, 2024
-
September 2023
- Sep 27, 2023 Pacific Northwest Engagement Session Sep 27, 2023
-
April 2022
- Apr 20, 2022 Why book an engagement session? Apr 20, 2022
-
April 2021
- Apr 11, 2021 Spring Photo Shoot Inspiration Apr 11, 2021
-
March 2021
- Mar 7, 2021 Image within an Image Mar 7, 2021
-
February 2021
- Feb 21, 2021 Telling a Story with Photography Feb 21, 2021
- Feb 14, 2021 Finding Inspiration for Landscape Photography Feb 14, 2021
- Feb 7, 2021 Improve your Landscape Photography Feb 7, 2021
-
January 2021
- Jan 31, 2021 Top 10 Photo Spots In & Around Boston Jan 31, 2021
- Jan 24, 2021 DIY Engagement Photoshoot Jan 24, 2021
- Jan 17, 2021 Top 3 Fun Photography Tricks Jan 17, 2021
- Jan 10, 2021 Who is bopphoto? Jan 10, 2021